As an online professional, you have the unique opportunity to accept business on a global scale! However, not all business accounts support international bank wire transfers. For example, choosing a lesser-known bank for better interest rates and lower fees often means you miss out on some services. This doesn’t mean you need to turn away international clients, though!
With Stripe, you can still capture business on a global scale, even when your business bank account doesn’t provide such services. In just 3 simple steps, you’ll have everything you need to collect payment internationally. Let’s go!
Step 1: Create a new customer record in Stripe
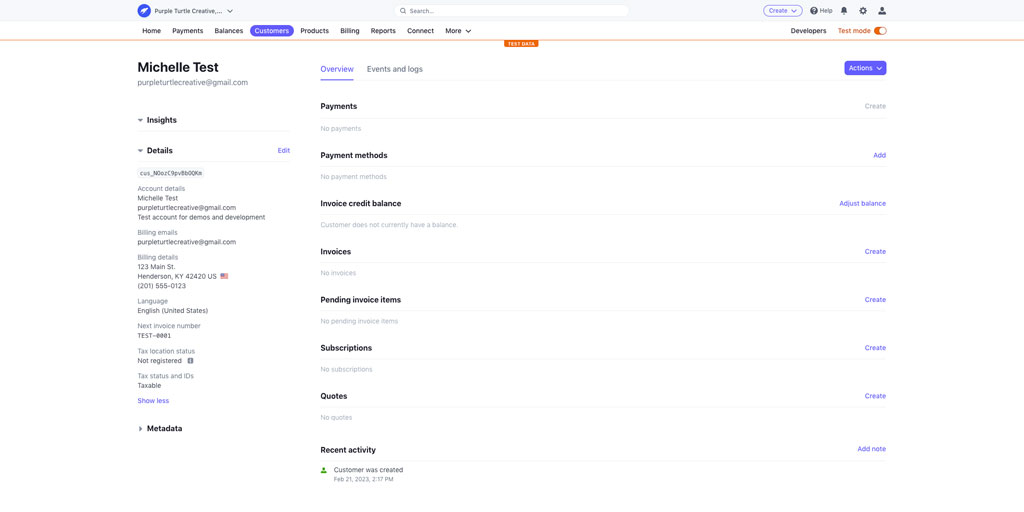
In the top navigation bar, click “Customers” to display the list of your current customer records.
Click the purple “+ Add customer” button in the top-right of the Customers screen. This will open a modal to input your customer’s billing information.
If you’ve already created your international customer’s record in Stripe, go ahead and open it.

Step 2: Create the customer’s ACH payment method within Stripe
To accept a bank transfer, you need to prompt Stripe to create a Wells Fargo proxy bank account as a payment source on the customer’s record. We can do this by creating a draft invoice on the customer’s record.
To begin, scroll down on the customer’s page to the “Invoices” section. Click “Create” on the far right.
Within the draft invoice, scroll to the “Payment” section and select “Email invoice to customer with link to payment page”.
Under the “Payment options” subheading, click “Add payment option” and select “ACH credit transfer”.

At this moment, Stripe automatically creates the virtual bank account for this customer record.
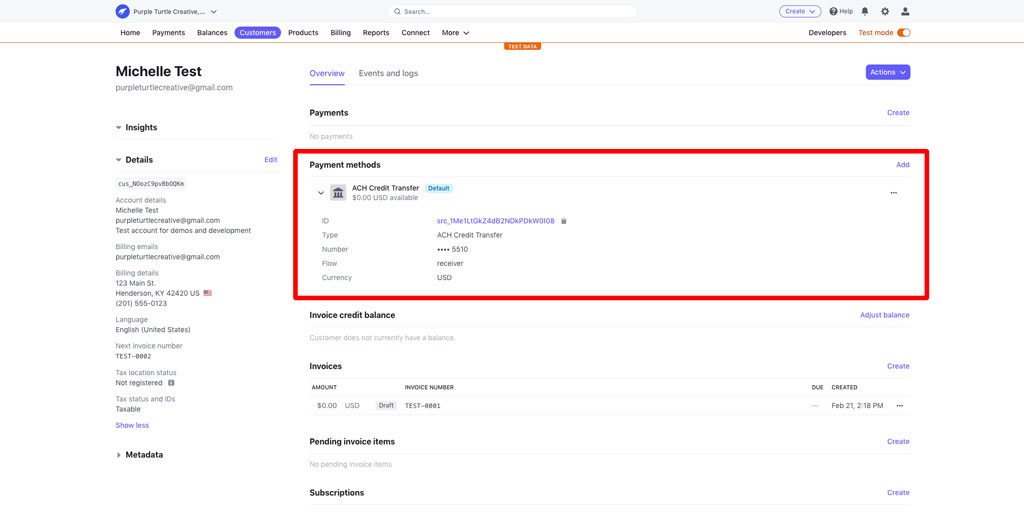
To confirm that the Wells Fargo payment source was successfully created, first exit out of the draft invoice by clicking the “X” in the top-left of the screen. Next, go back to the customer’s record and confirm there is an entry under “Payment methods”. It should be titled “ACH Credit Transfer” and display a zero balance like “$0.00 USD available” (or whatever currency your Stripe account is set to use).

Step 3: Provide the Stripe payment information to your international customer
Typically, there are about 4 standard pieces of information that your international client will need from you to initiate the wire transfer. Here’s how to get each piece of necessary information.
Account Holder’s Name and Address
Since Stripe automatically created the Wells Fargo bank account, you may be wondering who the account holder is.
When your client asks for this information, use the business name and address associated with your Stripe account.
You can find this information by clicking the settings gear icon in the very top-right of any Stripe dashboard screen. Under “Business settings”, find the section labeled “Your business” and click “Account details”. You should then see the “Account name” and “Business address” associated with your Stripe account.
Bank Routing and Account Number
Remember how we prompted Stripe to create the “ACH Credit Transfer” payment method in Step 2? This is the bank account information you’ll need to provide to your customer for the international bank wire transfer’s destination account.
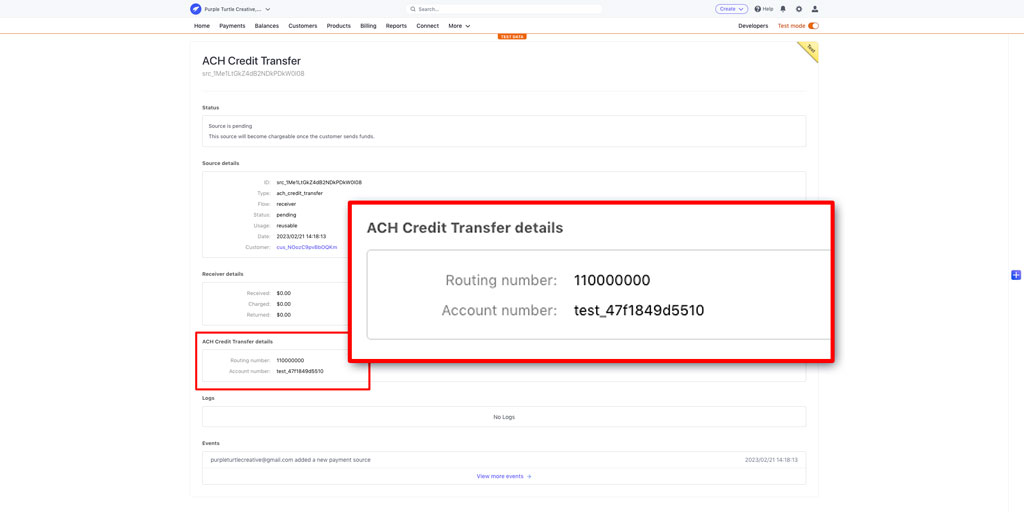
Navigate to the customer’s record and click the “ACH Credit Transfer” payment method. It should expand to reveal additional information. Then click the ID value. It is a long string of random alpha-numeric characters prefixed with src_.
You should now see various sections of information about the payment source. Scroll down until you find the section titled “ACH Credit Transfer details”. There, you’ll find the “Routing number” and “Account number” fields to provide to your customer for the international bank wire transfer.

SWIFT Code
Another way you can find the bank account and routing numbers is actually how you can also find the SWIFT code for the virtual Wells Fargo bank account!
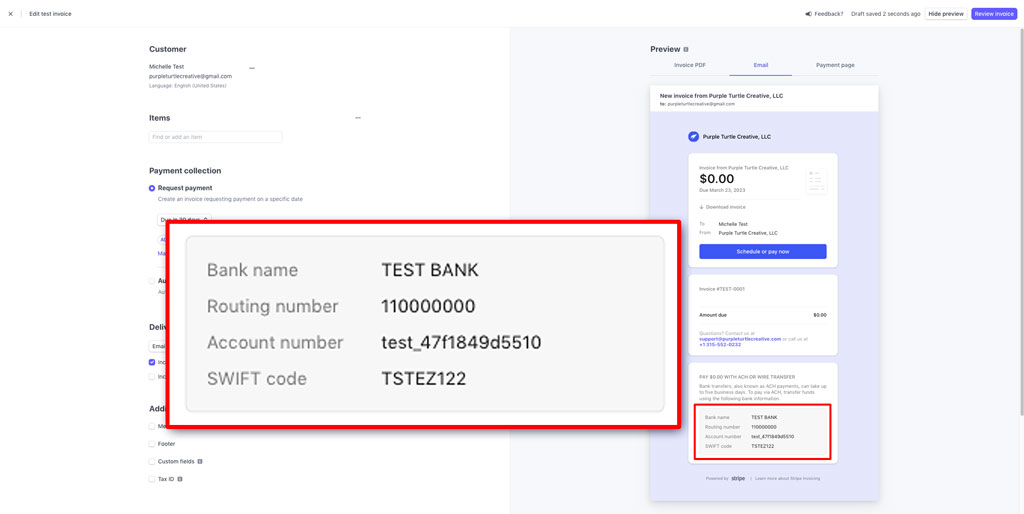
Navigate back to the draft invoice we created in Step 2 on the customer’s record. If you already deleted the draft invoice, that’s okay! You can go ahead and create a new invoice. The bank account information is tied to the customer’s record in Stripe, so it will be the same for every invoice associated with the customer. As you complete more work for the client, they can simply keep depositing to the same Wells Fargo account to credit their running balance.
In the invoice, select “ACH credit transfer” as a “Payment option”. The invoice “Email” preview pane, should list the bank information in the last section.
For the United States, the “Bank name” is “WELLS FARGO BANK, N.A.” and the “SWIFT code” begins with WFB.

Step 4: Submit a charge to withdraw the transferred funds
After waiting at least 5–7 bank business days, you should see the deposit in your customer’s record. You can check this by navigating to your customer’s record once again.
In the customer’s record, take a look at the “ACH Credit Transfer” payment method. The description text should now have more than $0.00 USD available. It should match the amount that your client transferred to you.
But wait! This money isn’t yours just yet! To be able to withdraw these funds from Stripe, you must create a charge (or charges) on the customer’s record.
If your client doesn’t need an invoice document associated with the payment, then you can simply click “Create” next to the “Payments” heading. Note that a simple “payment” charge record will still send your client a receipt email, if you have receipt emails enabled.
Alternatively, you can also submit an invoice. If the invoice is created after funds are deposited to the virtual Wells Fargo bank account, then select “Automatically charge a payment method on file” in the “Payment” section. This will immediately mark the invoice as paid, provided that enough funds were deposited to cover the invoice’s “Amount due”.
Note that you can create an invoice or payment charge on the customer record before or after your client transfers funds!
Congratulations! You’ve gone global! 🌎🎉
Now that you’re accepting payments internationally, you no longer need to turn away so many valuable prospects. You’ve also drastically expanded your brand’s reach! Just make sure you understand the tax obligations of each business relationship.