Many of us set up our development machines with Git one time and then never need to touch its configuration again for several years. It’s usually just a matter of setting your name and email for commit authorship, and then providing authentication for your repository server such as GitHub. Since these two configurations usually happen at the same time, you may not realize your Git authorship is actually easily spoofed and not inherently protected by your GitHub login.
How easy it is to push fraudulent commits
It took me 2 easy minutes to push a fraudulent commit as my friend to my GitHub repository. I simply changed my user.name and user.email to the same entries I saw from past commits by him in another repo’s git log. I then pushed a commit I made with these settings, and voilà. My commit (with his authorship settings) displayed in GitHub as though he committed it himself. It showed his avatar and linked to his profile all the same!
The worst part is that he has absolutely no idea that I did this. Of course, I deleted the fraudulent commit, but it really showed just how easy it is to publish spoofed commits.
Like most fraud, you don’t even know it’s happening to you
If somebody authors commits under any email that’s associated with your GitHub profile, you will not get an email warning of suspicious activity. No permission is needed, and it is not difficult for anyone to do. Without signed commits, there is no mechanism to prove that you actually made the commit. Git allows anyone to manipulate commit information—such as the author, committer, and timestamp. Without commit signatures, you can’t differentiate between legitimate and fraudulent commits just by looking at the history. This makes it difficult to track malicious activity, detect when it happens, or identify the individual responsible.
Commit verification is too easy to ignore
Thankfully, as easy as it is to spoof commit authorship, it’s just about as easy to protect yourself from it. GitHub will even embellish each of your signed commits with a reassuring “Verified” badge. It only takes 5 minutes to set up—that is, when you have a straight-forward guide like this! For me, it took much longer trying to read GitHub’s documentation on commit signature verification and talking in circles with ChatGPT. That’s what inspired me to write this article!
The sooner, the better
Finally, one last thing before we start signing your Git contributions: it’s better to set this up as soon as you can. I have so many unsigned contributions to both public and private repositories at this point. I wish I had set this up sooner so they were all signed to boost credibility. But alas! Now that I know this is so quick and easy to set up, I can start building credible commits moving forward. So let’s do this!
Step 1: Create a new SSH key
Run the following command to generate a new SSH public and private key pair on your machine. Then, follow the prompts to name the file pair and optionally set a password for using your private key.
ssh-keygen -t ed25519-t specifies the type of key to create. Ed25519 is recommended because it provides a very high level of security with shorter key lengths compared to older algorithms like RSA.
Step 2: Add to GitHub for signature verification
In GitHub, navigate to your profile’s settings, go to SSH and GPG keys, and add a new SSH key.
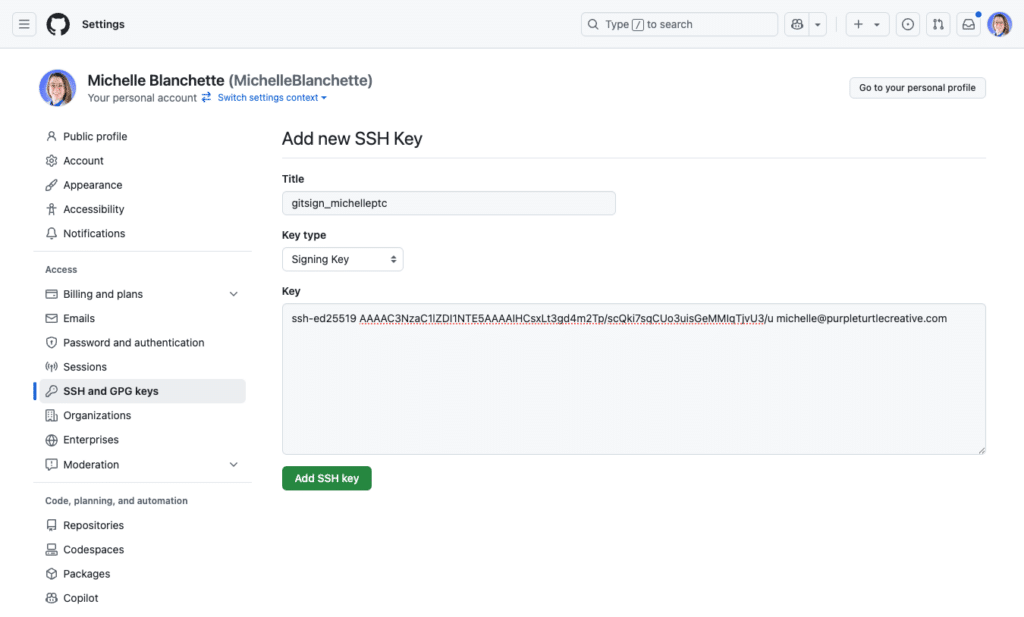
- Set the Title to something identifiable.
- For example, I just set mine to the name of the key file on my machine so I know which one GitHub is referencing.
- Set the Key type to Signing Key.
- In the Key text area input, paste the contents of your key’s
.pubpublic key file. - Click Add SSH key to confirm and save.
Step 3: Enable Git signing
With the following commands, we’ll now tell Git that we want to use an SSH key to always sign commits and tags that we author.
Note that the user.signingkey option value is the file path to your private key for generating each object’s signature. GitHub will then use its copy of your public key to verify each signature.
git config --global gpg.format ssh
git config --global user.signingkey ~/.ssh/gitsign_michelleptc
git config --global commit.gpgSign true
git config --global tag.gpgsign trueCode language: PHP (php)
Step 4: Commit, push, and verify
Now that we’ve configured Git to automatically sign commits and tags with your SSH private key, let’s go ahead and do that!
git add .
git commit -m "test signed commit with SSH key"
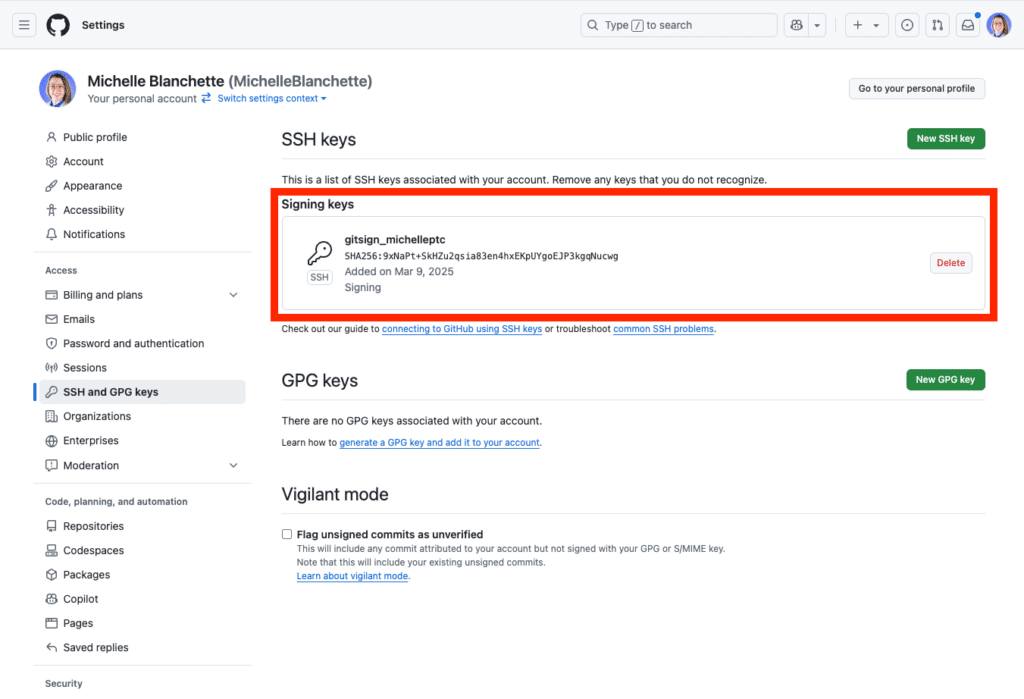
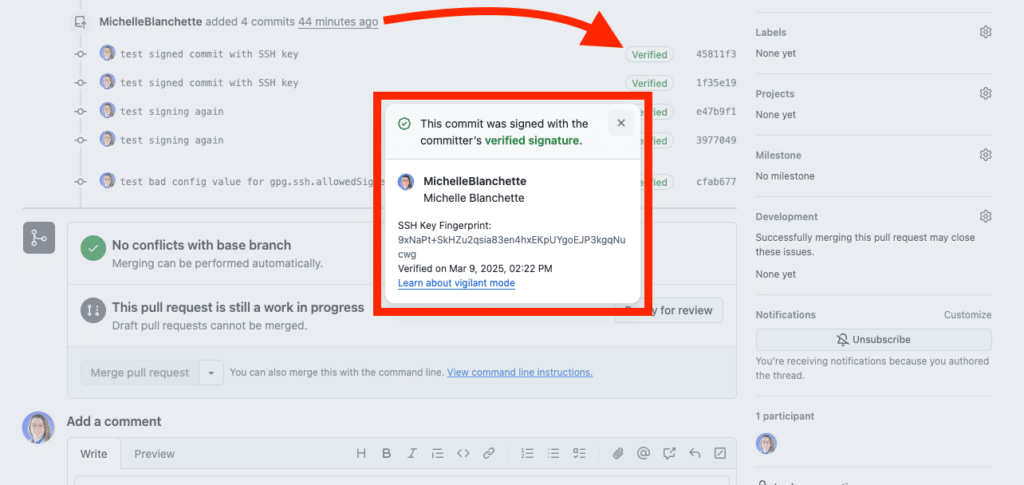
git pushCode language: Bash (bash)In GitHub, you should now see that your commits have the “Verified” badge. When you click it, you can see additional details about the signature:
Optional: Add allowed signers for local verification
To tell Git which public keys you are willing to trust, you can configure an “allowed signers” file. This allows you to verify signatures when viewing git logs on your machine, even in an offline environment.
To trust your own Git signing key, you can run the following command which will write the entry for you:
echo "$(git config --get user.email) namespaces=\"git\" $(cat ~/.ssh/gitsign_michelleptc.pub)" >> ~/.ssh/allowed_signersCode language: Bash (bash)So the file’s contents will look something like this:
[email protected] namespaces="git" ssh-ed25519 AAAAC3NzaC1lZDI1NTE5AAAAIHCsxLt3gd4m2Tp/scQki7sqCUo3uisGeMMIqTjvU3/u
Then, simply configure Git to use this file for checking trusted signers:
git config --global gpg.ssh.allowedSignersFile ~/.ssh/allowed_signersCode language: JavaScript (javascript)Viewing signature verifications locally
Now view your repository’s commit history with signature checks displayed:
git log --show-signatureCode language: Bash (bash)If the author’s signature aligns with the public key you trust for that “principal” in your allowed_signers file, then Git will tell you it’s good:
commit 3977049068c9c572f2c692625d844f2902ab9c43 (HEAD -> test-gitsign, origin/test-gitsign)
Good "git" signature for [email protected] with ED25519 key SHA256:9xNaPt+SkHZu2qsia83en4hxEKpUYgoEJP3kgqNucwg
Author: Michelle Blanchette <[email protected]>
Date:   Sun Mar 9 14:14:19 2025 -0400

    test signing again
As you can guess, this is also how GitHub knows whether to display the “Verified” badge next to your commits or not. When you add your public key to your GitHub profile for signing, you’re effectively telling GitHub to trust that key for signing commits authored by your email address(es). It’s the same thing.
Error: Missing key. No principal matched.
If you have a malformed entry in the allowed signers file, you may see an error like “missing key” following the file and line number.
If there’s no entry in your allowed signers file starting with a signed commit’s authoring email, Git will inform you “No principal matched”. This isn’t really an error (unless there’s a formatting issue). If you trust the authenticity of a commit in the history, then you can add the author’s email and SSH key to your allowed signers file.
In the following log entry, you can see that both of these errors are present even though Git considers the signature to be good:
commit 3977049068c9c572f2c692625d844f2902ab9c43 (HEAD -> test-gitsign, origin/test-gitsign)
Good "git" signature with ED25519 key SHA256:9xNaPt+SkHZu2qsia83en4hxEKpUYgoEJP3kgqNucwg
/Users/michelle/.ssh/allowed_signers:1: missing key^M
No principal matched.
Author: Michelle Blanchette <[email protected]>
Date:   Sun Mar 9 14:14:19 2025 -0400

    test signing again
If you’re seeing unexpected issues like these, be sure to confirm that your entries are formatted correctly according to ssh-keygen:
For verifying Git signatures, an entry will typically take this format:
<commit_author_email> namespaces="git" ssh-ed25519 <ssh_public_key>