When starting a new business, it’s best to minimize your operating costs as much as possible. This reduces your financial risk to start your new endeavor. It also gives you an edge against your competitors because you can offer lower prices to attract the market’s attention. Still, there are some services that a budding business can’t go without. One such service is custom domain email addresses.
Most businesses choose to just follow the crowd and sign up for a Google Business account. They assume there is no alternative and commit to paying the monthly fee. Well, I’m here to let you know there is another way! It just takes a little bit of upfront configuration, same as getting set up with any service.
If your business handles less than 1,250 emails per month, then you can create custom email addresses at your website’s domain for free. All you need is a free Gmail and Mailgun account. Let’s get started!
Add SMTP User Accounts in Mailgun
First, you must add email user accounts for your domain in Mailgun. To do this, sign into Mailgun and navigate to Sending > Domain settings. Now click the tab titled “SMTP credentials”. You should see there is already an entry for [email protected]. If the domain is not what you were expecting, ensure the correct domain is selected in the “Domain” dropdown in the top-right of the screen.
To add another user account, click the button in the top-right of the screen titled “Add new SMTP user”. You can then enter the username you would like to create, which is the part before the @-sign.
Once created, there will be a notification in the bottom-right of your screen to copy the account’s generated password. If you missed it, don’t worry. Just click “Reset password” and Mailgun will generate a new password again for you to copy. If you prefer to set your own password instead, just change the “Password creation method” to “Manual”. When resetting the password for any SMTP user in Mailgun, you always have the option to choose between “Automatic” or “Manual” password creation.
Now that you’ve created your first email user, continue adding other users and storing their passwords in a secure location. Here are some common email address user names you might want to consider:
- support@yourdomain.com
- admin@yourdomain.com
- sales@yourdomain.com
- hello@yourdomain.com
- michelle@yourdomain.com (Try using your own name or staff members’ names!)
Create an Email Forwarding Rule in Mailgun
To start receiving emails for the custom email addresses you just created, simply create a “Receiving Route” in Mailgun. Here’s how to do it:
- In your Mailgun account, click “Receiving” in the lefthand menu.
- Click “Create route” in the top-right of the page.
- In the edit screen, set “Expression type” to “Catch All”.
- Flip the switch under “Forward” and type the receiving email address, such as your free Gmail address.
- If you’d like, enter a helpful note for the “Description” field. For example, I set mine to “Receive all messages at Gmail”.
- Click “Create route” at the bottom.
Fantastic! You are now forwarding all emails to your Gmail inbox. Go ahead and give it a try by sending yourself an email! Note that you will only receive messages sent to the SMTP user accounts that you created, so be sure to add all possible recipient addresses that you’d like.
Troubleshooting
If the SMTP user address was not created, you will receive an error message in your sender’s message thread that looks something like this:
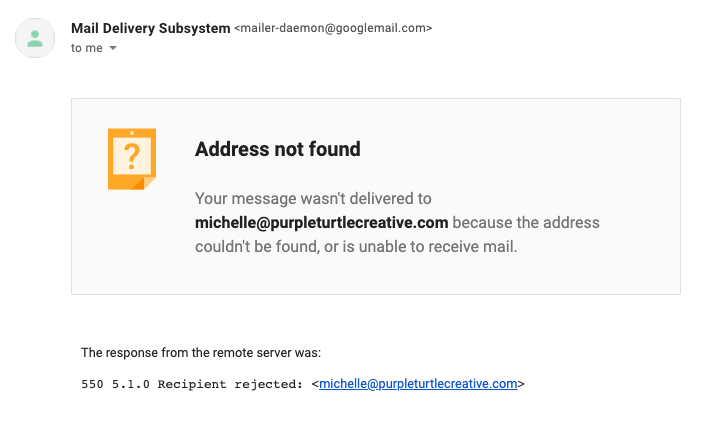
This usually happens when you are sending to the wrong address, so be sure to review for typos! To avoid mistakes, you can copy the full email address directly from the SMTP credentials listing in Mailgun. This also helps you confirm that the SMTP user address does indeed exist, too!
If the routing rule was not configured properly in Mailgun, then the email message will silently fail. This is because the recipient email address successfully received the message, but then Mailgun didn’t route it anywhere further.
You can confirm this by reviewing the Sending > Logs in Mailgun for the address domain. If the routing rule is working properly, you should see 3 log rows:
- The earliest timestamped log shows that the email message was Accepted at your custom domain email address. This means the SMTP user address exists in Mailgun and successfully received the email.
- When a routing rule is correctly configured for forwarding, the next log should show that the email was Accepted at your forwarding address.
- Finally, the following log should show that the email was Delivered to your forwarding address.
To ensure you’re looking at the correct log entries, you can click the gear icon in the Actions column to view the message’s Details. This will show you the “From”, “To”, and “Subject” fields of the email. If you’re comfortable reading JSON data, you can also click the log row to expand its details without leaving the Logs screen.
Add Your SMTP Accounts to Gmail
Now that you’re able to receive emails at your new custom email addresses, let’s now talk about sending emails from those new accounts. All we need to do is connect them in your Gmail account settings.
To add one of your new SMTP user accounts to Gmail, follow these steps:
- Navigate to your account settings in Gmail by clicking the cog in the top-right of the screen. Now click “See all settings”.
- Click the “Accounts and import” tab at the top of the screen.
- Under the section labeled “Send mail as”, click “Add another email address”.
- Enter the sender display name and email address, then click “Next step” to continue.
- Now that you’re asked to provide SMTP server credentials, navigate back to Sending > Domain settings > SMTP credentials in Mailgun where your accounts are listed.
- At the bottom of the screen, you’ll see a section titled “SMTP settings”. Use these values to complete the Gmail form. It should go something like this:
- SMTP Server: smtp.mailgun.org
- Port: 587 (most secure and reliable)
- Username: [email protected] (for example)
- Password: (the password Mailgun created for the account)
- If you lost the password, simply click “Reset password” for the address in Mailgun to generate a new one for you to copy.
- Secured connection using TLS (recommended)
- Click “Add account”. If all went well, you will receive a verification email for the newly added address in your Gmail’s inbox.
- Copy the code from the verification email and paste it into the input field to complete verification.
Confirm by Sending Some Tests
Now, try replying to one of the test emails you sent earlier when confirming the ability to receive emails. You should be able to select the alias in the From field when composing your reply. Go ahead and send the email, then ensure you receive the email as expected. Once you’ve received the email, be sure to confirm the sender name and address. If you don’t like the sender name, simply click “edit info” next to the alias address in your Gmail’s settings.
Once your tests look good, you now have a fully functional custom domain email address to use as you wish! Just remember to repeat this process for each custom domain email address that you’d like to create.
Is this really FREE?
If you are routing less than 1,250 emails per month, then Mailgun’s SMTP service is indeed free for you under their Flex plan!
For my web development business, I find this to be perfect. I currently don’t send to any large mailing lists or do any other sort of bulk mailing. I simply use my custom email addresses for business communication purposes with my users and service providers.
If you exceed the limit one month, the service is still incredibly cheap because additional messages are only $0.001 each. That’s $1.00 per 1,000 extra emails. Since the first 1,250 emails are free, this means it’s actually only $1.00 to handle 2,250 messages via Mailgun! So even if you have a lucrative month, Mailgun won’t charge you a large amount of money. I really appreciate flexible billing plans because there are a lot of uncertainties when starting a small business.
For the latest pricing information, refer to Mailgun’s pricing page. It has a nifty slider to help you select the plan that’s right for you!